Also here is a video of how the shelves work. Courtesy of Foodstoragemadeeasy.net and youtube
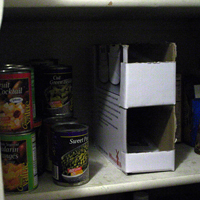
Included here is a link that will give a diagram of how to mark the sides of the shelve before you begin to glue it together. The link also shows a measurement table which needed to be amended a bit. So below is the fixed table. (we added 1/8" to the sides so that the cans wouldn't get stuck going down)
http://foodstoragemadeeasy.net/fsme/docs/shelfplan.pdf
Instructions and Measurements for can rotating shelves. Website with video and instructions
Description | Fruit Can | Vegetable Can | Evap Milk Can | Soup Can | Make |
Sides | 10 x 11 1/2 | 10x 13 | 10 x 13 | 10 1/2 x 12 | 2 |
Back | 5 3/8 x 9 1/4 | 5 1/4 x 10 | 4 3/4 x 10 | 4 1/2 x 10 1/2 | 1 |
Upper and Center Shelves | 4 7/8 x 8 | 4 6/8 x 9 3/4 | 4 2/8 x 9 3/4 | 4 1/4 x 9 1/8 | 2 |
Lower Shelf | 4 7/8 x11 5/8 | 4 6/8 x 13 1/8 | 4 2/8 x 13 1/8 | 4 1/4 x 12 1/8 | 1 |
Upper Front* | 1 1/4 x 7 1/4 | 3 3/4 x 6 7/8 | 3 3/4 x 6 1/2 | 3 1/4 x 6 1/2 | 1 |
Lower Front* | 4 1/4 x 7 1/4 | 1 1/4 x 6 7/8 | 1 1/4 x 6 1/2 | 1 1/4 x 6 1/2 | 1 |
Wood Block | 1 1/2 x 4 3/4 | 1 1/2 x 4 5/8 | 1 1/4 x 4 1/8 | 1 1/2 x 4 1/8 | * |
A | 3 1/2 | 3 1/4 | 3 1/4 | 2 3/4 | * |
B | 3 1/2 | 3 1/4 | 3 1/4 | 2 3/4 | * |
C | 3/4 | 1 1/4 | 1 1/4 | 1 3/4 | * |
D | 7 5/8 | 7 3/4 | 7 3/4 | 7 7/8 | * |
E | 4 7/8 | 5 1/4 | 5 1/4 | 5 7/8 | * |
Number of cans stored | 9 | 12 | 12 | 12 | * |
Notes: 1. Material: Thick 1 ply or 2 ply corrugated cardboard. | |||||
2. Glue gun with glue, or calking, | |||||
3. Reinforce all exterior exposed edges with a coating of glue. | |||||
4. All dimensions are in inches. 5. * Crease and fold appromimately 3/4" from each end and fit to the width. Wrap around the sides. 6. A-E, Use these measurments on "Side" part to mark where to glue pieces onto it. 7. We did not make the woodblock and it worked out fine. | |||||
No comments:
Post a Comment